An order bump is a method of advertising another offer on the checkout screen. As a user proceeds through the checkout process, they will notice a simple opportunity to add another offer to their total.
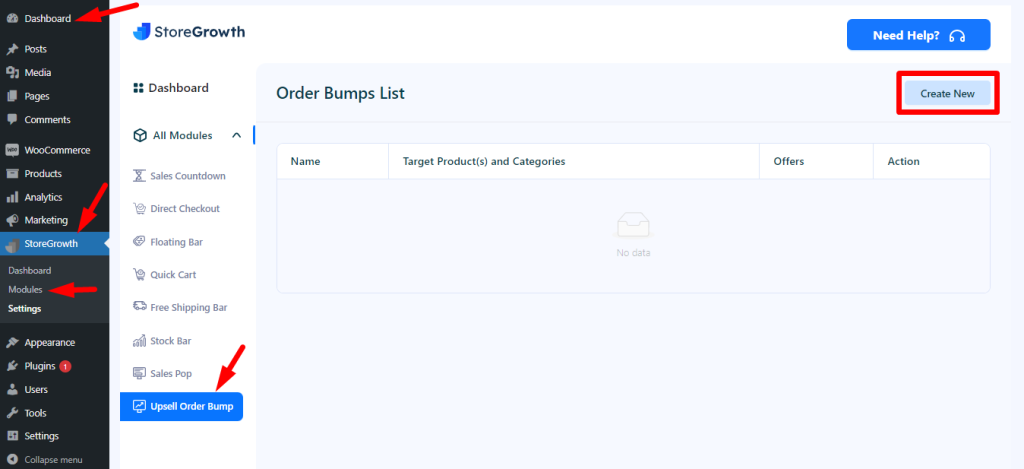
To open this module, just click on Dashboard→ StoreGrowth → Modules→ Upsell Order Bump.

Here, you can create an order bump list by clicking on the create new button. And then you will find two settings.
- Basic Information
- Design Section

1. Basic Information
This setting contains a few input fields. By entering information into the input areas, you can create an order bump.
The input fields are depicted in the attached image below.

As you can see, you can construct an order bump by filling out these input forms.
You can give the bump a name and pick your target products and categories here. The target products are polo shirts and T-shirts with logo, and the category is apparel. You can also customize the bump schedule here.
In the offer area, you can specify the title and description of the offered products. The title T-shirt is set here. You can choose whether to provide a price or a discount in the space below. As you can see, we chose a 20% discount.
When a customer wants to buy our target products, such as a polo or t-shirt with logo, and proceeds to the checkout, the bumps will appear on the checkout page and look like this:

2. Design Section
There are two design sections: the template section and the content section. The order bump can be modified based on your preferences.

Template section: There are some sub-sections in the template section. They are given below:
- Bump Offer Box: There are some input fields in here such as Border color, Top margin and bottom margin .You can customize these input fields as your own choice. There is also a Overview border field where you can choose dotted, dashed or solid border. If you want , you can keep no border here by choosing no border option.
- Discount Section: There are three input fields here such as background color, text color and font size. You can customize these input fields as your own choice
- Product Section: Similarly, you can modify these sections in the same way as you would a discount section.
Content section: This is for the discount, where you can set text.
After this, you can preview the changes to your design, and it will look like this: