To open this module, just click on Dashboard→ StoreGrowth → Modules→ Sales Pop.
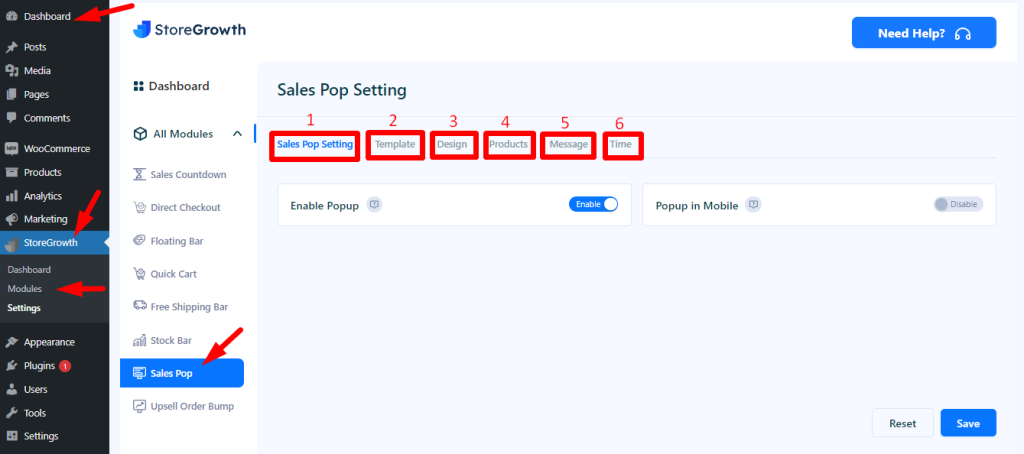
In this module, we will discuss the different kinds of settings, such as:
- Sales pop setting
- Template
- Design
- Products
- Message
- Time
1) Sales pop setting

You have the option to enable or disable the popup on the left side of this setting. If the popup is enabled, it will appear whenever someone makes a purchase. You cannot see this otherwise. When the popup is enabled here, it appears on the shop page.

Additionally, there is a popup that can be enabled or disabled on the right side. However, only mobile devices use it.
2)Template

You have the option to choose any type of popup template in this setting. Here, the marked item has been chosen, and the sales page displays it as the marked item on the right side.
3) Design
In this part of this module, you can change the whole design of the sales pop.
The first two things in this part are image style and popup style.

If you want to change the style of the image, first of all, you need to enable the Image Style. After enabling this, you will see different kinds of options for changing styles.
Here is a snapshot of those options.

Now you can change any style you want.
Similarly, you can change the popup style by enabling Popup Style.

After enabling this, you will find different options here, such as Color, Popup position, Border radius and Popup width. Here, you can change the color of the popup background as well as other input fields as your own choice.
If you want to change the popup position to the right bottom, it would look like this:

There are a few designs below the image style and popup style. Here is a snapshot of them.

Open product link in new tab: Here, you can both enable and disable this. If you enable it, this will open a new tab.
Link image to product page: You can also enable and disable this. It will work only when it is enabled. It will link the image to the product page.
Show close button: You can show the close button in the sales bar when it is enabled; otherwise, it is not. You can close the sales bar notification by clicking the close button on the shop page.
Text Style: Here, you can also enable and disable this. If you want to customize the text style of the sales bar, you need to enable this; otherwise, you cannot customize the bar. If you enable this, you will find here different kinds of text style sections, such as:
- Normal Text
- Product name Text
- Time Text
- Country Text
- State Text
- City Text
- Shop name Text
Each of the sections contains three input fields. Here we show the Normal Text section.

You can simply change any of them by clicking them. You can change the color of the text by clicking on this and picking any color you want. Then you can change the font size as well as the font weight.
4)Products
In this product setting, you will find various sections such as External Link, Product Show Random, and so on. Here is a snapshot of the first four sections.

1. External Link: You can both enable and disable this by clicking on the marked field. If you want to add an external link, you should enable this.
2. Product Show Random: It can also be enabled or disabled. If it is enabled, then the products will show randomly on the page.
3. Product Source: Here, if you click on product source, it will pop up a list. It refers to different methods of displaying products in your online store:

Get from Billing: This source is based on the customer’s prior billing records for the things they purchased.
Select Products: You can easily choose any kinds of products you want from this source.
Latest Product: It relates to the most current product additions. This source makes it simple for customers to find the newest items in your store.
Select Categories: Customers can choose the various product categories they want using this source.
Recently Viewed Product: This source shows products that a customer has recently viewed, encouraging them to revisit and potentially make a purchase, leveraging their browsing history.
4. Select Popup Products: If you click on this, a pop-up with the available products will appear.
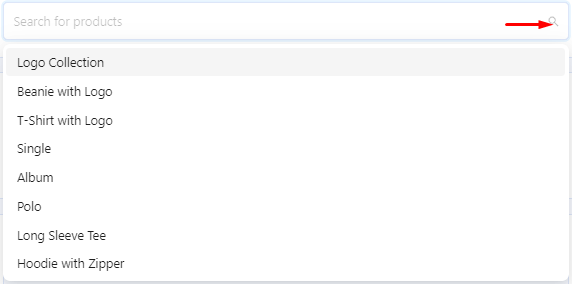
From here, you may use the pop-up window to search for products and choose any of the products you like.
The final three inputs in this product setting are:
- Virtual First Name
- Virtual Location
- Visibility Control
Virtual First Name: It is about the customer who purchases our products. Here, you can set the customer’s name. If you enter “John” as the name, it will appear in the sales bar. It would look like this.

Virtual Location: The place where the customer purchased the product is referred to. Please write each location on a separate line, following the format: ‘city‘, ‘state‘, ‘country‘. Use commas to separate the city, state, and country. If you don’t have a state, leave an empty comma in its place (e.g. city,,country). If you don’t have a city, leave an empty comma in its place (e.g. ,state,country).
Visibility Control: It speaks of the sales bar’s visibility. You can select any page you like, and it can be shown anywhere on the page. It may also be visible to users who are logged in or not on the page, or to everyone.
5)Message

The name of the customer, the name of the product, the customer’s location, and the time of the transaction can all be customized in this setting’s message popup area.
6)Time

Loop: If you enable the loop, the sales pop will show up repeatedly on the front-end page.
Notification Per Page: It defies the quantity of notifications per page.
Display Time: Here you can set the display time on the front-end page.
Next Time Display: The next notification will begin in seconds at this time.
Initial time delay: When your site loads, the notification will wait this amount of time (in seconds) before appearing.