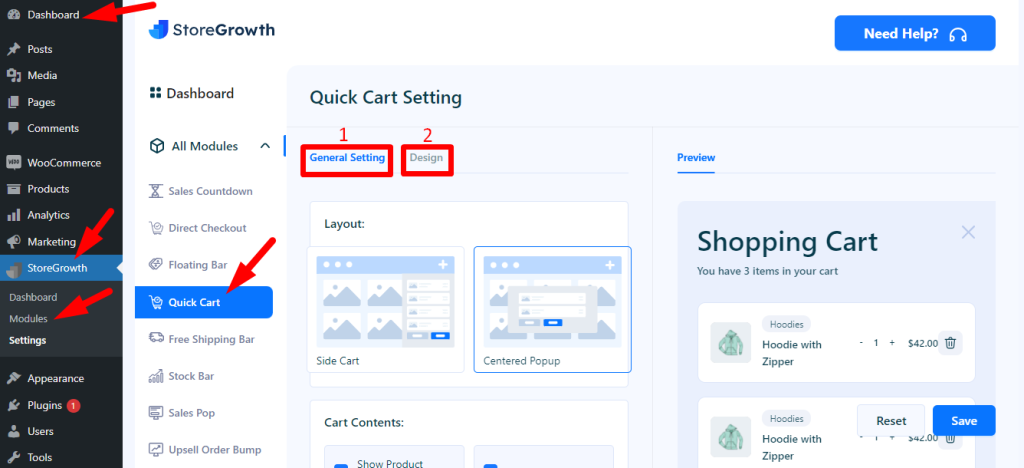
To open this module, just click on Dashboard→ StoreGrowth → Modules→ Quick Cart.

In this module, there are two settings.
- General Setting and
- Design
1. General Setting

In the general setting, there are two sections.
- Layout and
- Cart Contents
Here, you can customize both of them and preview them.
Layout: You’re able to choose a layout here. If you choose the side card layout, something like this would appear on the right side of the front-end page.

Likewise, if you choose the centered pop-up layout, the cart will appear in the front-end page’s center and will have the same appearance as the previous one.

Cart Contents: The fields that are shown in the cart contents can also be changed. By selecting them, you can display the product’s image, quantity picker, price, and the remaining items in the cart.
If you check all of them, then the cart would be like this:

You can also hide any kinds of contents from here by unchecking them.

The product image will be hidden if you uncheck the “Show Product Image” box, and it will appear as follows:

Also, if you uncheck the “Show Remove Icon”, the remove icon will be invisible.

Similarly, if you uncheck “Show Quantity Picker” and “Show Product Price” ,you will not see the product quantity and the product price. And they would look like them, respectively.


Here, you can also hide the promo coupon code section by unchecking ‘Show coupon’. This is for the pro version.
2) Design
In this part, you can also customize the whole design of the shopping cart.

The input fields that are shown here can be customized. Here, the cart icon’s position is set to bottom right, and it is the last one. Additionally, we chose blue as the background color for the action and shopping buttons. Next, change the widget’s background to the default color and the cart icon’s color to white.
The position of the cart icon can also be changed to the bottom right, where it will appear on the shop page. The shopping cart will appear when you click on it and will have this appearance.
